
Recently I started a job out of the home. I find myself struggling to find chunks of time to simply delve into my latest project. Our family tradition around Christmas has always been to take some time to visit family during the holidays. This year when we made our final plans, I thought…”Why not take my project with me?”
I’ve been working on this Double Wedding Ring quilt since April, whenever I can find time to get busy on it. It was meant to be a wedding gift for my son and his new bride back in July. If you knew me, you’d know…I don’t like having projects go unfinished. I’m known for pushing through and finishing. This one has been waiting for a long time in my book.
The obvious advantage to being home is that I have a designated place in my house where I don’t have to pack up and put away. My projects can stay as I leave them for as long as I need. Just as this one has.


(Here you see a couple of helpers. One of my very best friends who helped me a ton with cutting this quilt! She owns a Go Cutter and it saved my life 100 times over during this project! Being able to cut so many pieces at a time was a huge time saver and I can’t image ever getting it done as quickly as I did without it! Here is a link to the Go Cutter I used with the 11 1/2″ Double Wedding Ring Die Cut template that I used. The other is my son. He was helping me balance a disappearing 9 patch panel for the back of a T-shirt quilt I was working on. You can see my DWR on the design wall right beside him.)
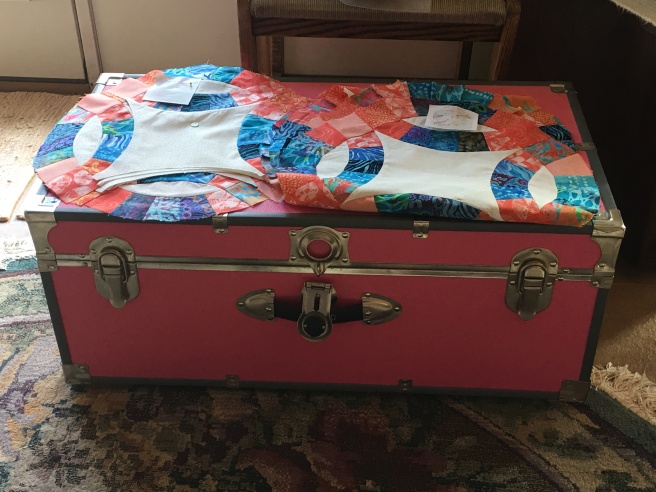
When thinking about what I’d need I simply worked my way through the project in my head while I walked around my sewing space. Thinking of rulers and seam rippers, rotary cutter and matt, threat, etc. You know that drill, I’m sure. I have this handy-dandy trunk (pictured above-pink of course!) and it worked perfectly for traveling with all my supplies. I had my trunk loaded down with everything in it (including my iron) with exception to my machine, the Go Cutter, and my extension table which I was not willing to do without!


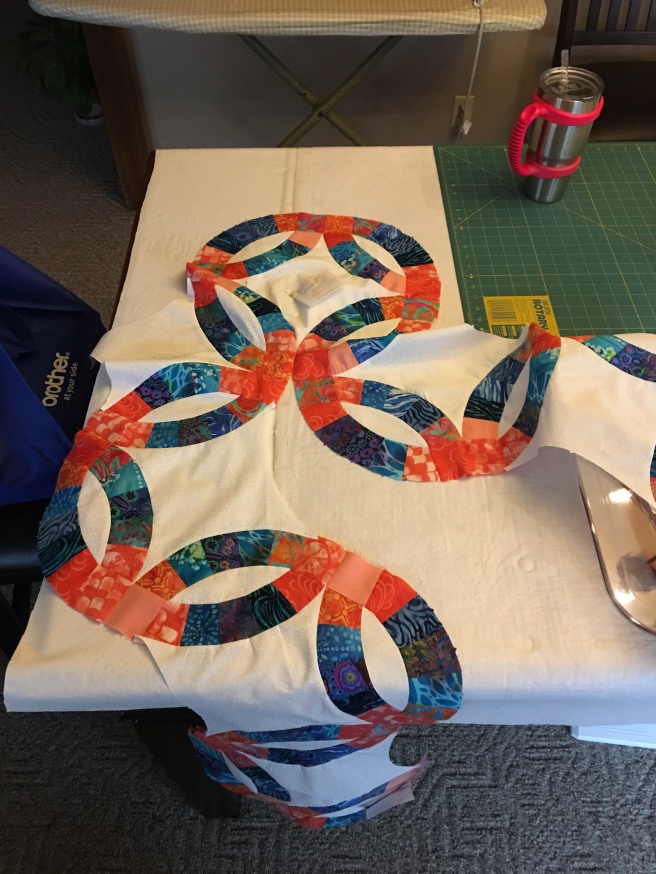
My husband’s parents have a perfect dining room which proved to be a GREAT space for me to spread out in. I had everything I needed (with exception to my design wall). It didn’t take me long to figure out I was going to have to be very organized in keeping track of my blocks since I couldn’t just throw them up on the wall and leave them there.


I began labeling each of the blocks (I was working this quilt in columns instead of rows-normally I’d label Row 1 Block 1, etc.) and stacking them in their respective “Columns” around the dining room. When labeling and stacking I was careful to pin them to the top cresent of each block. I did not want do deal with geting things twisted and then having to struggle to figure out which block went where.
Off Topic Bonus #1: Most Helpful Tool In Creating a Double Wedding Ring Quilt
I did want to mention my very favorite tool for this project. This again is thanks to my friend pictured above for this very helpful hint.


Yep, that’s right! It’s a large tweezers. Who would have thought, right? When sewing the curves of a double wedding ring you find your curved edges opposing each other nearly all the time. This can become very frustrating. It requires a TON of patience! These tweezers helped me keep my layers of fabric in line even though their curves were moving in opposite directions! It by far wins my “Tool of the Project” Award-if there were such a thing! Try it! I’m convinced that this should be in your bin of “must haves”!
Off Topic Bonus #2: Use your Ironing Board for more than just Ironing!


When sewing together the columns of this quilt and working with the opposing curves their weight quickly becomes a problem. The heavier they become the more they pull and stretch the fabric. This keeps your seams from lining up appropriately. I find that using my ironing board to help hold that weight in front of my machine gives me a BIG advantage! Much like a little shelf. It can make reaching a little awkward (I slide the board under the table slightly to make reaching easier. I usually stand when I sew so this proved to be very beneficial for me! (P.S. I was working off a raised table which was counter top height. It was perfect for standing and sewing! Just in case you are wondering, I did not have any problems with cutting at that height. My husband has promised to raise my regular height sewing table at home when we get there! I can’t wait! Being able to stand is such a benefit for me! I love not having to mess with a chair getting up and down and up and down, especially when ironing frequently.)
Off Topic Bonus #3: 3 Strikes and You are OUT! Rule
Let me just reiterate the difficulty in the project. I definitely had to apply the 3 Strikes Rule here! I don’t know about you, but when I’m working on a project and begin to get tired/frustrated often that is when I make mistakes. My rules is…when you make your 3rd mistake (or in my case…have made 1 big one and you know it’s “over”) you take a break. This picture was taken as I was assembling this column. If you look closely you can see that I sewed the edge of the cresent onto the wrong edge of the center piece, thus creating a circle-STRIKE 1. Then when I removed the cresent I realized I seam ripped the wrong seam- STRIKE 2. I had to completely remove the cresent and start over at that point. It was grueling! HaHa! Usually, my “break” means…no more until tomorrow. That keeps me from becoming overwhelmed with the project and giving up! Even the best of us mess up, right?!?
Bringing my project on vacation with me was totally worth it! I was able to plug away logging more than 40 hours of work time there! I’d already had over 30 hours logged in on this project when I arrived and I am excited to announce that this queen sized, Double Wedding Ring top is complete!
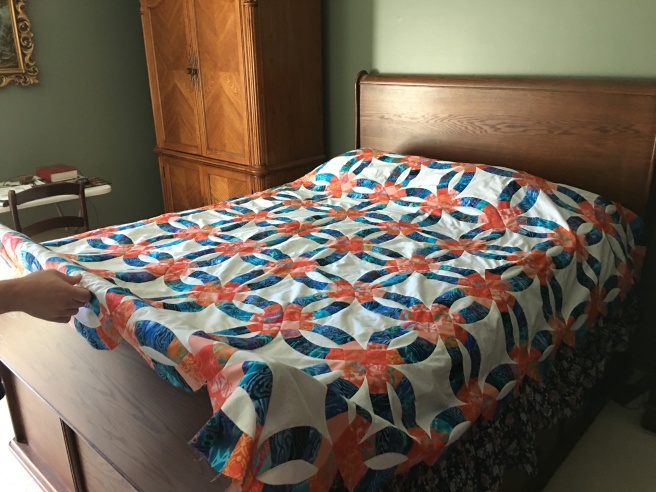
I’m planning to hand quilt it. I’m super excited about learning this age-old craft! I’m sure I’ll be blogging out that too!
This quilt is definitely, hands down, the hardest project I’ve tackled yet. Patience and moving slowly were key elements and even still there are points that are not exactly lined up. That defines the quilting world right? Quilts are hand-made and will hopefully be treasured forever. This design is such an oldie and a goodie! That’s why I feel I must hand quilt it I guess. I just can’t seem to stomach the idea of spending so much time and effort in getting it together and then just throwing it up on a machine to quilt.
Credits:
I’d like to give a HUGE THANK YOU! to my family who picked up the slack helping with meals and various other tasks so that I could sew so much! I’m grateful for your support and love EVERY Day! What a blessing you are to me!

I have the same 3 strikes rule! If you’re messing up something that frequently it means your tired and you need to just walk away.
LikeLike